A common error with Set-AzureVNetGatewayKey

Recently I’ve helped a customer configuring a hub-and-spoke topology where they had one VNET at the ‘Centre’ configured with VPN to their on-premises network which then needed to be connected to multiple ‘satellite’ VNETs using VNET-VNET connectivity.

A very good walkthrough of how to configure advanced topologies and multi-hop networks on Azure can be found here

We’ve taken a step-by-step approach so we first established cross-premises connectivity using the portal UI, we then started to add the satellite networks one by one.

On the satellite sites we never had any issues as we could do everything through the UI. Expanding the connectivity on the central network required editing the configuration XML to link to multiple networks and after the first two, arguably as we were growing overly confident, we got the following error when trying to set the pre-shared key for the VPN gateway on the central network –

Set-AzureVNetGatewayKey -VNetName CentralVnet -LocalNetworkSiteName SatelliteVnet3 -SharedKey A1B2C3

Set-AzureVNetGatewayKey : BadRequest: The specified local network site name SatelliteVnet3′ is not valid or could not be found.

It took us a little while to figure out what we were missing as we didn’t get this every time. Turns out that occasionally we got ahead of ourselves and tried to update the shared key before importing the updated network configuration xml with the added link between the central network and the satellite one. Given that they key is set on the combination of the two, if you try to set it before making the actual link the command, understandably, fails (although the error message could be a bit clearer)

As an aside – we’ve also seen the following error when executing this command –

Set-AzureVNetGatewayKey : An error occurred while sending the request.

This happened when we delayed long enough for the AAD token in the PowerShell session and we could verify that by trying to execute any other command such as Get-AzureVNetGatewayKey or even Get-Azure Subscription. Using Add-AzureAccount to obtain a new token solved that one easily enough.

Deploying an internal website using Azure Web Roles

The most common use for Web Roles is to host web workloads that are accessible from the public internet, but for enterprises a common requirement is to deploy load balanced web workloads that are only accessible from within their network (the Azure VNET and, in many cases, from on-premises via ExpressRoute) Turns out that this is quite easy to achieve, but perhaps not well known – To achieve this, two additions are needed in the cloud service project’s configuration file. Firstly – in the service definition file the web role is likely to have an InputEndpoint, to connect the endpoint to the internal load balancer one can add the loadBalancerName attribute  –

<Endpoints> <InputEndpoint name=”Endpoint1″ protocol=”http” port=”80″ loadBalancer=”MyIntranetILB” /> </Endpoints>

Then, in the service configuration file one has to link the web role to a subnet and corresponding vnet and provide the details around the load balancer, this is done by adding the following section after the Role element within the ServiceConfiguration Element –

<NetworkConfiguration> <VirtualNetworkSite name=”[vnet name]” /> <AddressAssignments> <InstanceAddress roleName=”[role name]”> <Subnets> <Subnet name=”[subnet name]” /> </Subnets> </InstanceAddress> </AddressAssignments> <LoadBalancers> <LoadBalancer name=”MyIntranetILB”> <FrontendIPConfiguration type=”private” subnet=”[subnet name]” staticVirtualNetworkIPAddress=”172.24.19.46″ /> </LoadBalancer> </LoadBalancers> </NetworkConfiguration>

Notice that you can (optionally) add a static ip for the load balancer – this is important as you’re likely to want to configure a DNS entry for this There is no need to create anything in advance other than the VNET and the Subnet – the internal load balancer will be created as part of the deployment. Upon a successful deployment the web role will NOT be accessible via the public internet and you will have a load balanced internal IP to access it from the VNET.

One of the questions I’ve been asked is whether the IP assigned to the ILB in the configuration file is registered with the DHCP server, and the answer appears to be yes. when I’ve configured an IP address right at the beginning on the subnet, the web roles and other VMs provisioned later on the network, were assigned IP addresses greater than the load balancer, so one does not have to worry about IP clashes when configuring an ILB in this fashion.

Azure Data Factory– using FTP server as input

A customer I’m working with is looking to put in place a process to reconcile large invoices (=several million line items) from various suppliers. 

The process requires obtaining the suppliers invoices (typically from an FTP server) and matching it against the customer’s own data, flagging any exceptions.

The approach I wanted to look into is how to use Azure Data Factory (ADF) to obtain both the invoices and the customer data, store a snapshot of both data sets in blob storage, use HDInsight to perform the reconciliation and push the outcome (invoices to pay and list of line item exceptions) back to a local database.

Reading and writing customer data is easily done using an on-premises data gateway, however at this point in time ADF does not have built in capability to obtain data from an FTP server location.

It does, however, support custom .net activities so I sat down to create one but before I go into the details of the (very simple!) implementation, it would be useful to explain the context, and for simplicity I’ll describe a simple set-up that simply uses the activity to download a file on an FTP server to blob storage.

The input table

A pipeline in ADF requires at least one input table. In this scenario that input table is largely irrelevant as the real input data is what I’ll obtain from the FTP server

To satisfy ADF, I’ve created a table that points at a blob I’ve created in my storage account. The blob’s contents aren’t actually important, I just have the digit ‘1’ and as I expect my process to run daily I set the table’s availability to 1 Day. A crucial configuration here, though, is to set the table’s waitOnExternal to an object (can be empty) which will indicate to ADF that the blob is created outside ADF.

{
    "name": "1DayTrigger",
    "properties": {
        "structure": [
            {
                "position": 0,
                "name": "dummy",
                "type": "Int"
            }
        ],
        "published": false,
        "location": {
            "type": "AzureBlobLocation",
            "fileName": "trigger",
            "folderPath": "trigger",
            "format": {
                "type": "TextFormat"
            },
            "linkedServiceName": "adftstorage"
        },
        "availability": {
            "frequency": "Day",
            "interval": 1,
            "waitOnExternal": {}
        }
    }
}

The output table

I’ve then created my output table; in my example it has a couple of properties, stored in the same blob account (but I’m creating a folder structure that uses the supplier name and the date the invoice was processed in, and, crucially set the waitOnExternal to null and the availability to daily. this availability will drive the pipeline execution and with it my custom activity

{
    "name": "DailyDownloadedInvoiceSupplier1",
    "properties": {
        "structure": [
            {
                "position": 0,
                "name": "ItemNumber",
                "type": "Int"
            },
            {
                "position": 0,
                "name": "Price",
                "type": "Decimal"
            }
        ],
        "published": false,
        "location": {
            "type": "AzureBlobLocation",
            "fileName": "invoiceDetailSmall.csv",
            "folderPath": "invoices/supplier1/{Slice}",
            "format": {
                "type": "TextFormat",
                "columnDelimiter": ","
            },
            "partitionedBy": [
                {
                    "name": "Slice",
                    "value": {
                        "type": "DateTime",
                        "date": "SliceStart",
                        "format": "yyyyMMddHH"
                    }
                }
            ],
            "linkedServiceName": "adftstorage"
        },
        "availability": {
            "frequency": "Day",
            "interval": 1,
            "waitOnExternal": null
        }
    }
}

The pipeline

Finally, I created a pipeline that uses these tables as input and output and contains my custom activity –

{
    "name": "GetInvoiceSupplier1",
    "properties": {
        "description": "GetInvoiceData",
        "activities": [
            {
                "type": "DotNetActivity",
                "transformation": {
                    "assemblyName": "ADF.FTP.dll",
                    "entryPoint": "ADF.FTP.FtpGet",
                    "packageLinkedService": "adftstorage",
                    "packageFile": "packages/ADF.FTP.zip",
                    "extendedProperties": {
                        "SliceStart": "$$Text.Format('{0:yyyyMMddHH-mm}', Time.AddMinutes(SliceStart, 0))",
                        "Supplier": "Supplier1",
                        "FtpServer": "yossi.cloudapp.net",
                        "FtpPath": "invoicedetailtiny.csv",
                        "FtpUser": "yossidahan",
                        "FtpPassword": "SomePassword"
                    }
                },
                "inputs": [
                    {
                        "name": "1DayTrigger"
                    }
                ],
                "outputs": [
                    {
                        "name": "DailyDownloadedInvoiceSupplier1"
                    }
                ],
                "policy": {
                    "timeout": "00:30:00",
                    "concurrency": 1,
                    "retry": 3
                },
                "name": "FtpGet",
                "linkedServiceName": "OnDemandHadoop"
            }
        ],
        "start": "2015-03-18T00:00:00Z",
        "end": "2015-03-28T00:00:00Z",
        "isPaused": false,
        "hubName": "datafactoryyd_hub"
    }
}

The input and output for the pipeline are configured to the tables created in the previous steps. I’ve added a policy to indicate a concurrency of 1 and 3 retries, 30 minutes apart

The diagram view for this pipeline looks like this –

image

Back to the pipeline itself, the most interesting thing in this simple pipeline is, of course, the configuration of the custom activity –

The custom activity is developed as a .net class library which is then zipped and uploaded to a linked storage account. the transformation section of the activity configuration provides the details of where to find the package(being a ZIP file containing the contents of the Debug or Release folder of my built project) and how to run it – the name of the storage linked service and the path to the package file in it, the name of the actual assembly within the package and the entry point to call (fully qualified name of the class)

The extended properties section includes a set of ‘custom’ properties I’ve defined which I need within my components, name – the connection details of the FTP server and the path to the file download.

The only other important thing to note is that, this custom activity is going to run on an HDInsight cluster, provided by the second linked service configuration, outside the transformation object.

The cluster can be an already-provisioned cluster or a configured linked service of an on-demand cluster.

In the latter case, in the custom activity, there are two linked services configured – the one within the transformation configuration is a storage account where to look for the package. The other is at the end of the activity configuration and that is a link to an HDInsight cluster, which can be either an already-provisioned one or an on-demand cluster 

In the latter case ADF will provision a cluster on schedule deploy the activity to it and schedule its execution. the cluster will be destroyed when there’s no more activity on it but, crucially, this means that if I have further processing steps (as I will n the real implementation) this can still run on the same provisioned cluster and ADF will only de-provision it once there are no more steps to execute on it.

The custom activity

So – what actually goes into the ADF.FTP package?

Well – in this sample case this is a simple class library produced more or less by following the tutorial.

I’ve created a class that implements IDotNetActivity’s only method – Execute – which accepts 4 parameters – 2 lists for the input  and output tables, a dictionary for the extended properties and a logger and returns a dictionary back.

The input table is the collection of inputs to the pipeline, in my case a single table pointing at the dummy blob and cab pretty much be ignored.

Similarly, the output table is a collection of the outputs to the pipeline. For simplicity I’m assuming a single blob output, more on this shortly.

The extended properties dictionary is a set of key value pairs providing the items I’ve configured in the pipeline.

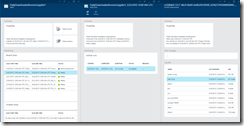
The logger is straight forward – it allows writing log entries which, for each run, its contents can be access via the run details (in the diagram view – double click on the output table, select a completed (or failed) time slice, select the relevant run activity and then the user-0.log file to view its contents
image

(the file is actually in the blob storage linked to, in my case, the on-demand HDInsight cluster, in a contained called adfjobs)

The actual FTP code I wanted to get to looks like this  –

//create FTP request
FtpWebRequest request = (FtpWebRequest)WebRequest.Create(ftpfileUrl);
request.Method = WebRequestMethods.Ftp.DownloadFile;
request.Credentials = new NetworkCredential(username, password);

//get FTP stream
using (FtpWebResponse ftpResponse = (FtpWebResponse)request.GetResponse())
{
    Stream responseStream = ftpResponse.GetResponseStream();

    //upload FTP stream to blob
    outputBlob.UploadFromStream(responseStream);
}

In this example I’m getting the FTP input stream and using that directly to upload to the blob stream.

This is quite efficient but also drive the restriction to having only 1 output table. In any real code I’d check if I have more than one outputs and if so I’d have to read the contents of the FTP file into memory (or potentially local disk) before uploading to multiple destinations.

To get to the FTP stream I needed the properties I’ve configured in the pipeline, so this code was prefixed with

//read the expected custom properties from the extendedProperties dictionary
string ftpfileUrl;
string username;
string password;
readExtendedProperties(extendedProperties, logger, out ftpfileUrl, out username, out password);

with readExtendedProperties simply being –

private static void readExtendedProperties(IDictionary<string, string> extendedProperties, 
    IActivityLogger logger, out string ftpfileUrl, out string username, out string password)
{
    ftpfileUrl = string.Format("ftp://{0}/{1}", extendedProperties["FtpServer"], extendedProperties["FtpPath"]);
    logger.Write(TraceEventType.Information, "Ftp downloading from url {0}", ftpfileUrl);

    username = extendedProperties["FtpUser"];
    password = extendedProperties["FtpPassword"];
    logger.Write(TraceEventType.Information, "using credentials: {0}/{1}", username, password);
}

The other piece needed, before running the FTP code above is to be able to connect to the output blob storage.

The activity receives the output table as a list of ResovedTable. As discussed, in my case I check to confirm there’s only one and extract the first item in the list. I then have the same method outlined in the tutorial to extract the storage connection string from the ResovledTable’s Linked Service –

in my main function I call

//as we only have one output table, extract it from the list
ResolvedTable outputTable = outputTables.First();
//get the blob storage connection string from the linked service configuration
outputStorageConnectionString = GetConnectionString(outputTable.LinkedService);

In GetConnectionString if the output table is indeed an AzureStorageLinkedService it will have a ConnectionString I can return –

private static string GetConnectionString(LinkedService asset)
{
    AzureStorageLinkedService storageAsset;
    if (asset == null)
    {
        return null;
    }

    storageAsset = asset.Properties as AzureStorageLinkedService;
    if (storageAsset == null)
    {
        return null;
    }

    return storageAsset.ConnectionString;
}

I then follow the same approach to extract the output path from the outputTable’s Table configuration

folderPath = GetFolderPath(outputTable.Table);

with the implementation being

private static string GetFolderPath(Table dataArtifact)
{
    AzureBlobLocation blobLocation;
    if (dataArtifact == null || dataArtifact.Properties == null)
    {
        return null;
    }

    blobLocation = dataArtifact.Properties.Location as AzureBlobLocation;
    if (blobLocation == null)
    {
        return null;
    }

    return blobLocation.FolderPath;
}

And that is pretty much it…putting it all together, adding a few validation rules and log lines here and there and I’ve got a rudimentary FTP download activity for ADF. 

After building the project I zipped up the contents of the Debug folder and uploaded the ZIP to the container configured in the pipeline and when the pipeline ran I could see the contents of the file in the FTP server copied into my blob storage as requested.

Where to go from here?

There are a few things I’d add in real implementation – I’ve already discussed supporting multiple outputs, I think this would be quite important. In theory one could also support multiple output types, but actually I think that moving to blob storage and then using built-in ADF activities such as the copy activity makes most sense.

I also think that adding a property indicating whether the file on the FTP server should be deleted after the transfer completed could be useful if the source system cannot adhere to time-based paths (or otherwise  the time slice which I do include in the extended properties needs to be used when resolving the FTP path)

It might also be important to put in place something to confirm the file on the FTP server is fully written. many implementation that rely on FTP use a second flag file to indicate the main file is ready.

Reading metric data from Azure using the Azure Insights library

A couple of months ago I published a post on how to get metrics from the Azure API Management service in order to integrate it into existing monitoring tools and/or dashboards.

One of my customers is building a solution with a significant use of Document DB at the heart of it and asked how we could do the same for Document DB.

In this blog post I will walk through the steps required to obtain the metrics for Document DB using the preview release of the Microsoft Azure Insights Library (I’ve used version 0.6.0) to obtain metric data for Document DB using Azure Active Directory (AAD) for authentication but the same approach should work for any of the services that are accessible via the Azure Resource Manager (and the Azure Preview Portal)

There are three steps required to obtain metrics through Azure Insights –

  1. 1. [One time] access control configuration
  2. 2. Authenticating using Azure Active Directory
  3. 3. Requesting the metrics from Azure Insights

Configuring Access Control

Access to resources through the Azure Resource Manager (ARM) is governed by AAD and so the first step is to have an identity, configured with the right permissions to our desired resource (a Document DB account, in this case), which we could use to authenticate to Azure AD and obtain a token.

The token would then be used  in subsequent requests to ARM for authentication and authorisation.

Naturally, we need our solution to work programmatically, without an interactive user, and so we need to have a service principal with the right permissions.

Service Principals exist in AAD through web Applications – every configured web application is also a service principal in AAD and its client Id and client secret can be used to authenticate to AAD and obtain a token on the apps behalf.

this documentation article shows how to create such application using Powershell, configure it with permissions to use the ARM API as well as how to obtain an authentication token for it

the following steps can be used to configure this through the protal –

In the Management portal open the directory’s application tab and clicked on the Add button at the bottom toolbar.

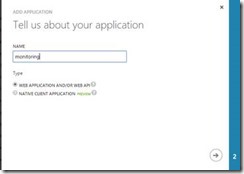
In the popup window, enter a name for the application ( I used ‘monitoring’, as I plan to use it to monitor my services) and keep the web application radio button selected

clip_image002

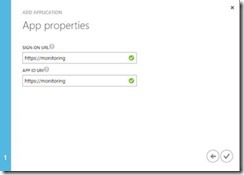
In the next screen enter a sign-on URL and application URI.
The values do not really matte as long as they are unique, as this application isn’t really going to be used by interactive users and so does not perform any browser redirection

clip_image004

As I’ve mentioned – the application represents a service principal in the directory.
To be able to authenticate using this service principal need three pieces of information – the client Id (essentially – the username of the principal), the client secret (the equivalent to the password) and the tenant Id (which is the authentication authority).

Once the application is created, within the application page in AAD, generate an application secret and note that as well as the client Id.

clip_image006

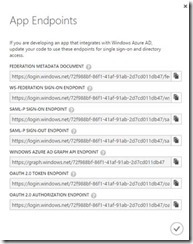
The tenant Id can be extracted using the View Endpoints button at the bottom toolbar and noting the GUID part of any of the endpoints shown –

clip_image008

With the application created,  the service principal is ready and the next step is to configure role-based-access-control to provide permissions to the relevant resources to the principal.

At the moment this needs to be done via PowerShell

To see all existing service principles –

  1. Open Azure PowerShell console
  2. Use Azure-AddAccount and sign-in with an account that has permissions to the directory
  3. Switch to AzureResourceManager mode using the Switch-AzureMode AzureResourceManager command
  4. Ensure you’re using the correct subscription using Select-AzureSubscription
  5. Use the Get-AzureADServicePrincipal command to see a list of the service principals in the active directory.

Doing so also reveals the service principal’s Object Id which is needed in order to assign permissions to the newly created principal to the relevant resource. This is done using the New-AzureRoleAsignment cmdlet.

The following example assigns a service principal the Contributor role for a specific resource group.

The scope can be expanded, of course, to more specific elements such as the document db account or even a specific database –

New-AzureRoleAssignment -ObjectId {service principal’s objectId} -RoleDefinitionName {role i.e Contributor} -Scope /subscriptions/{subscription id}/resourceGroups/{resource group name}

Authenticating using Azure Active Directory

With a principal in place and the right permissions set, the next step is to authenticate to Azure AD using the service principal’s credentials (the client id and client secret).

In .net this can be done using the Active Directory Authentication Library, here’s a brief code sample-

private static string GetAuthorizationHeader (string tenantId, string clientId, string clientSecret)
{
	var context = new AuthenticationContext("https://login.windows.net/" + tenantId);
	ClientCredential creds = new ClientCredential(clientId, clientSecret);
	AuthenticationResult result = 
		context.AcquireToken("https://management.core.windows.net/", creds);
	return result.AccessToken;
}

This code snippet returns an authorization token from AAD for the service principal which can subsequently be used in requests to the Azure Resource Management to authenticate and authorise these requests.

As an aside – obtaing a token can also be done in PowerShell as follows –

$password = ConvertTo-SecureString {client secret} -AsPlainText –Force

$creds = New-Object System.Management.Automation.PSCredential ({client id}, $password) 
Add-AzureAccount -ServicePrincipal -Tenant {tenant id} -Credential $creds

David Ebbo has a great blog post title Automating Azure on your CI server using a Service Principal which walks through this in detail.

Requesting metrics from Azure Insights

Now that authentication has been completed and we’ve obtained a token for the principal, we’re ready to call the Azure Resource Manager API and retrieve the metrics required. The best way to do so is to use the aforementioned Microsoft Azure Insights Library.

The first step is to instantiate an InsightsClient with the right credentials, here’s a code snippet that does that (and uses the GetAuthorizationHeader method described earlier) –

private static InsightsClient getInsightsClient(string subscriptionId, string tenantId, string clientId, string clientSecret)
{
	Uri baseUri = new Uri("https://management.azure.com");
	string token = GetAuthorizationHeader(tenantId, clientId,clientSecret);
	SubscriptionCloudCredentials credentials = new 
		TokenCloudCredentials(subscriptionId, token);
	InsightsClient client = new InsightsClient(credentials, baseUri);
	return client;
}

With an instance of the insights client obtained, reading metrics is a simple case of creating a Urli pointing at the required resource and a filter string describing the required metrics and time frame before calling the GetMetricsAsync method of the MetricsOperations property in the client –


The result of this call is a MetricListResponse containing the metrics requested for the period grouped

InsightsClient client = getInsightsClient(subscriptionId,tenantId , clientId, clientSecret);

string start = DateTime.UtcNow.AddHours(-1).ToString("yyyy-MM-ddTHH:mmZ");
string end = DateTime.UtcNow.ToString("yyyy-MM-ddTHH:mmZ");

string resourceUri = string.Format("/subscriptions/{0}/resourceGroups/{1}/providers/Microsoft.DocumentDB/databaseAccounts/{2}/", subscriptionId, resourceGroupName, documentDbName);
string filterString = string.Format("(name.value eq 'Total Requests' or name.value eq 'Average Requests per Second' or name.value eq 'Throttled Requests' or name.value eq 'Internal Server Error') and startTime eq {0} and endTime eq {1} and timeGrain eq duration'PT5M'", start, end);

CancellationToken ct = new CancellationToken();

Task<MetricListResponse> result = client.MetricOperations.GetMetricsAsync(resourceUri, filterString, ct);

return result.Result;

according to the time-grain value supplied

image

Two things worth noting, as they caught me out initially –

  1. MetricValues only contains records for time slots for which there is data. If you consider the request above – I’ve asked for data for the last hour aggregated as groups of 5 minutes. the result will not necessarily contain 12 values under MetricValues groups. it will only contain records form time aggregation windows in which there was activity
  2. In addition – there is some latency in getting the data, at the moment of about 20 minutes, but this is likely to be reduced.
    The combination of these meant that for a while I thought this my  code was not working  because during my tests  I was only running load against my Document DB account for a short whilst at a time and then immediately requested the metrics.
    Because of the latency – data was not yet available, which meant MetricValues was always empty.

Once the above was pointed out to me it all made perfect sense, of course.

Integration testing with Azure Mobile Services (or– how to generate authorisation token)

A customer I’m working with is deploying a mobile application backed by Azure Mobile Services and as part of their CI process they needed to automate integration testing of the mobile backend.

Given that an Azure mobile services .net backend is essentially ASP.net MVC Web API, unit testing it as part of a continuous deployment wasn’t much of an issue and, in-fact, integration testing would have been easy too  – simply calling the web API from a test project – if it wasn’t that our scenario, like many others’, involved authentication.

Required Headers

Every request to the mobile services backend needs to include the X-ZUMO-APPLICATION http header carrying the application key.

This does not pose any challenges for testing because it is essentially a constant value.

For backend operations that require authentication, however, in addition to the application key header the client must also supply a valid authorisation token through the X-ZUMO-AUTH header and in order to automate testing the test code must be able to programmatically provide a valid authorisation header.

Authentication flow with Mobile Services

In order to understand how best to approach this, it is important to understand the authentication flow of mobile services as I find that many have a small misunderstanding around it.

In many oAuth flows the client contacts the identity provider directly to obtain a token before calling the resource carrying the token retrieved. This is not the case with Mobile Services which uses a server flow-

Triggering authentication using the Mobile Services SDK (App.MobileService.LoginAsync) opens a browser that is directed at the mobile services backend and and not the identity provider directly.

The backend identifies the identity provider requested (which is a parameter to LoginAsync) and performs the necessary redirection based on the identity configuration.

The identity provider authenticates the user and redirects back to mobile services backend which is then able to inspect the token issued by the identity provider and use it to create the ZUMO authorisation token.

The key point here is that, with Mobile services, the authorisation token used is a JWT token which is ALWAYS created by mobile services as part of the authentication flow.

This approach means that following a valid authorisation flow, all tokens exchanged use the same structure irrespective of the identity provider.

It also means, that tokens are interchangeable, as long as they are valid.

Approach for Integration Testing

Understanding that the tokens are interchangeable, as they are always created by the Mobile Services backend, highlights a possible approach for integration testing – if I could create a valid token as part of my test code and supply it with the call I wish to test I could pass authentication at the backend and retrieve the results without being redirected to the identity provider for an interactive login.

So – the question is – can a token be created and if so – how?

To examine this lets first take a look at what a JWT token is –

The JWT token

A Json Web Token (JWT) has three parts separated by a dot (‘.’) -  the first part is a header indicating the token is JWT and the hashing algorithm used, the second part is the set of claims and the third part is a signature of the first two parts to prevent tampering.

The mobile services backend creates the JWT token and populates the appropriate claims based on the identity provider before signing the token with the accounts master key.

It is possible to examine the values in a token by obtaining it through tools such as Telerik’s Fiddler and decoding it using tools such as jwt.io

Here’s an example of the header and claim-set parts of a token generated following authentication with Azure Active Directory –

{
  "alg": "HS256",
  "typ": "JWT"
}
{
  "iss": "urn:microsoft:windows-azure:zumo",
  "aud": "urn:microsoft:windows-azure:zumo",
  "nbf": 1423130818,
  "exp": 1423134359,
  "urn:microsoft:credentials": "{\"tenantId\":\"72f966bf-86f1-41af-91ab-2d7cd011db47\",\"objectId\":\"c57dab9d-31a8-4cf5-b58c-b198b31353e6\"}",
  "uid": "Aad:XyCZz3sPYK_ovyBKnyvzdzVXYXuibT4R2Xsm5gCuZmk",
  "ver": "2"
}

Naturally – the signature part does not contain any additional information but is a combination of the first 2 parts – base64 encoded and hashed.

Creating your own JWT token

Josh Twist blogged on how one could create a valid Mobile Services token as long as one has access to the master key (hence the importance of protecting the master key); the code in Josh’s post is in node.js so I created the following c# equivalent to be able to use it from test projects in Visual Studio –

 private string createZumoToken(string masterSecret, string userId, DateTime notBefore, DateTime expiry)
        {
            int nNotBefore = convertToUnixTimestamp(notBefore);
            int nExpiry = convertToUnixTimestamp(expiry);

            string jwtHeader = "{\"typ\":\"JWT\",\"alg\":\"HS256\"}";
            string jwtPayload = "{\"iss\":\"urn:microsoft:windows-azure:zumo\",\"aud\":\"urn:microsoft:windows-azure:zumo\",\"nbf\":" + nNotBefore.ToString() + ",\"exp\":" + nExpiry.ToString() + ",\"urn:microsoft:credentials\":\"{}\",\"uid\":\"" + userId + "\",\"ver\":\"2\"}";

            string encodedHeader= urlFriendly(EncodeTo64(jwtHeader));
            string encodedPayload = urlFriendly(EncodeTo64(jwtPayload));

            string stringToSign = encodedHeader + "." + encodedPayload;
            var bytesToSign = Encoding.UTF8.GetBytes(stringToSign);

            string keyJWTSig = masterSecret + "JWTSig";
            byte[] keyBytes = Encoding.Default.GetBytes(keyJWTSig);

            SHA256Managed hash = new SHA256Managed();
            byte[] signingBytes = hash.ComputeHash(keyBytes);

            var sha = new HMACSHA256(signingBytes);
            byte[] signature = sha.ComputeHash(bytesToSign);

            string encodedPart3 = urlFriendly(EncodeTo64(signature));

            return string.Format("{0}.{1}.{2}", encodedHeader, encodedPayload, encodedPart3);
         }
         public string EncodeTo64(string toEncode)
        {
            byte[] toEncodeAsBytes
                  = System.Text.ASCIIEncoding.ASCII.GetBytes(toEncode);
            
            return EncodeTo64(toEncodeAsBytes);
        }
         public string EncodeTo64(byte[] toEncodeAsBytes)
         {
             string returnValue
                   = System.Convert.ToBase64String(toEncodeAsBytes);
             return returnValue;
         }
     
         public  DateTime ConvertFromUnixTimestamp(double timestamp)
         {
             DateTime origin = new DateTime(1970, 1, 1, 0, 0, 0, 0);
             return origin.AddSeconds(timestamp ); 
         }

         public int convertToUnixTimestamp(DateTime dateTime)
         {
             DateTime origin = new DateTime(1970, 1, 1, 0, 0, 0, 0);
             return (int)Math.Round((dateTime - origin).TotalSeconds, 0);
         }

         string urlFriendly(string input)
         {
             input = input.Replace('+', '-');
             input = input.Replace('/', '_');
             input = input.Replace("=", string.Empty);
             return input;
         }

As you can see from the code, thee really isn’t much to it – the only dynamic values in this example are the not-before and expiry timestamp (expressed as seconds from 1/1/1970) as well as, of course the user id and master key values. It is possible, of course, to add additional claims as needed, based on the identity provider used, as these become available to the code though the User object.

After creating the plain text version of the first two parts, encoding them to base64 and ensuring they are url friendly the code creates a hash of they key (master key + “JWTSig” ) and then used that to create an HMAC of the first two parts. This HMAC-SHA256 signature becomes the third part of the JWT token – the signature and as long as it is created correctly, the Mobile Services backend will accept the token.

Summary – putting it to use

So – to round things up – with the understanding of how mobile services authentication works, how the JWT token looks like and how one can be created this can be put into use as part of a continuous integration set-up where the release process can deploy the mobile services backend, along side any other components of the solution and then run a set of tests to exercise the environment from the outside.

Of course – this relies on sharing the master key with the developers/testers and embedding it in the test project, so this should not be done for production! (but is entirely suitable, in my view, for dev/test environments)

Getting Metric Data from Azure API Management

The Azure API Management portal provides a useful dashboard showing number of calls to an API over time, bandwidth used, number of errors and average response time.

Viewing this information in the online dashboard is useful, but integrating it into existing dashboards and/or monitoring tools is even more powerful so – what it takes to get this data programmatically?

Not much, as it turns out!

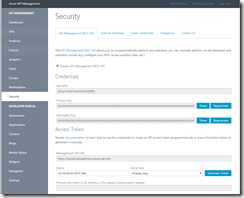
APIM has a good set of management APIs to itself, including reporting on metrics. The first step is to enable the API Management REST API, which can be done within the security tab of the APIM admin portal –

image

Then, for my exercise, I manually created an Access Token at the bottom of the page, which I’ll use later when issuing requests to the portal. This can be done programmatically

Now that I’m able to call the management API, it is time to experiment with some requests.

The security tab showed the base Url for the management api which takes the form of

https://{servicename}.management.azure-api.net

Every request to this url must include an api- version with the current value being – 2014-02-14-preview
The request also needs to include an Authorization HTTP header with the value being the access token generated either in the portal or programmatically.

There are many entities that can be operated on using the management API, the list is published here. In this case I wanted to look at the Report entity which can be use to retrieve metrics

Using this entity I can get usage metric by time period, geographical region, user, product, api or operation. I chose to get metrics by time so I appended to my url the entity path – /reports/byTime, the requests at this stage looks like this  –

https://apiyd.management.azure-api.net/reports/byTime?api-version=2014-02-14-preview

the byTime report takes 2 additional parameters – Interval, which defines the aggregation period  and $filer which can be used to restrict the data returned., I’ve decided to aggregate data in 40 day increments and requested data from August 2014, the full request looks like this –

https://apiyd.management.azure-api.net/reports/byTime?api-version=2014-02-14-preview&interval=P40D&$filter=timestamp ge datetime’2014-08-01T00:00:00′

and the response looks like this –

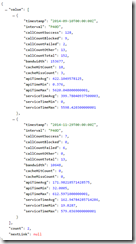
image

You can see that I get two groups (there are more than 40 days between today and last August, with the relevant metrics in them.

I could also change the accept HTTP header to text/csv to receive the data in CSV format –

timestamp,interval,callCountSuccess,callCountBlocked,callCountFailed,callCountOther,callCountTotal,bandwidth,cacheHitCount,cacheMissCount,apiTimeAvg,apiTimeMin,apiTimeMax,serviceTimeAvg,serviceTimeMin,serviceTimeMax
09/10/2014 00:00:00,P40D,128,9,2,13,152,153677,18,3,422.1049578125,0.376,5620.048,399.780409375,0,5598.4203
11/29/2014 00:00:00,P40D,7,0,6,0,13,10648,0,0,171.982185714286,32.0005,612.5971,162.947842857143,19.8287,579.0369

Using Azure API Management between client and Azure Mobile Services backend

I’m working on a solution with a customer which requires placing Azure API Management (APIM) between the mobile devices and the published Azure Mobile Services (ZuMo) .net backend.

Conceptually this is fairly straight forward, given that all of the Mobile Services capabilities are exposed as Web APIs but I needed to figure out what changes might be required to the client app to support that and prove that it works.

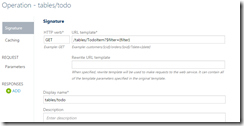
To get started, I created an API in Azure API Management with the relevant operations in APIM (for now I focused on the default GET request for the ToDoItem table so I defined a simple GET operation in APIM with the URL template /tables/TodoItem?$filter={filter}

image

The generated windows 8 app code for the ToDo item sample includes the following code to create the MobileServiceClient instance, which points at the ZuMo URL –

        public static MobileServiceClient MobileService = new MobileServiceClient(
            "https://travelviewer.azure-mobile.net/",
            "hmptBIjrEnAELyOgmmYPRPSOZlLpdo56"
        );

Naturally, to hit APIM instead of ZuMo directly, this needed to be updated to point at the APIM API published, in my case  I changed it to be

        public static MobileServiceClient MobileService = new MobileServiceClient(
            "https://apiyd.azure-api.net/travelviewer/",
            "hmptBIjrEnAELyOgmmYPRPSOZlLpdo56"
            );

Running the application with only this change was clearly not enough, I got the following error when trying to retrieve the ToDo items from the backend (currently configured to require no authentication)

image

This was not unexpected, but I wanted to prove the point. Trusted Fiddler provided more information – I could see the request going exactly as expected –

GET https://apiyd.azure-api.net/travelviewer/tables/TodoItem?$filter=(complete%20eq%20false) HTTP/1.1

and it included the various ZUMO headers (Installation Id, application, etc.

But the response was – HTTP/1.1 401 Access Denied

With the body providing the exact details –

{ 
   "statusCode": 401, 
   "message": "Access denied due to missing subscription key. 
               Make sure to include subscription key when making 
               requests to an API." 
}

Authentication to Azure API Management (APIM) is done by providing a subscription key either as a query string parameter (‘subscription-key’) or an HTTP header (‘ocp-apim-subscription-key’) and clearly the ZuMo client does not know it needs to do that, so – how do we work around that?

The answer, I believe, is to create an HttpMessageHandler or – more specifically – a DelegatingHandler.

The MobileServiceClient takes in a third parameter which is an array of such delegates that are then given the chance to process the outgoing requests and responses flowing through the client, this is a great opportunity to inject the missing HTTP header in a central place without affecting the application’s code.

and so I created a class that inherits from System.Net.Http.DelegatingHandler

class InsertAPIMHeader : DelegatingHandler
    {
    }

and I’ve overridden the main method – ‘SendAsync’ – and in it simply added the required header to the HttpRequest (in my case – hardcoded)

protected override Task<HttpResponseMessage> SendAsync(HttpRequestMessage request,
                                    System.Threading.CancellationToken cancellationToken)  
{ request.Headers.Add("ocp-apim-subscription-key", "84095a7d792a47738464faae6bf950d3"); return base.SendAsync(request, cancellationToken); }

The last step is to write that into the MobileServiceClient Constructor, in my App’s App.xaml.cs I’ve added an instance of the delegate as the last parameter

public static MobileServiceClient MobileService = new MobileServiceClient(
            "https://apiyd.azure-api.net/travelviewer/",
            "hmptBIjrEnAELyOgmmYPRPSOZlLpdo56",
            new InsertAPIMHeader()
            );


Running the app again and refreshing the list of ToDo items now works. inspecting the request in Fiddler shows the request now has the APIM subscription key header

GET https://apiyd.azure-api.net/travelviewer/tables/TodoItem?$filter=(complete%20eq%20false) HTTP/1.1
X-ZUMO-FEATURES: TT,TC
X-ZUMO-INSTALLATION-ID: 226d6ea7-2979-4653-96d4-a230128719c5
X-ZUMO-APPLICATION: hmptBIjrEnAELyOgmmYPRPSOZlLpdo56
Accept: application/json
User-Agent: ZUMO/1.2 (lang=Managed; os=Windows Store; os_version=--; arch=Neutral; version=1.2.21001.0)
X-ZUMO-VERSION: ZUMO/1.2 (lang=Managed; os=Windows Store; os_version=--; arch=Neutral; version=1.2.21001.0)
ocp-apim-subscription-key: 84095a7d792a47738464faae6bf950d3
Host: apiyd.azure-api.net
Accept-Encoding: gzip

and, importantly – I actually got a result, meaning that APIM accepted the request, forwarded it to the mobile services backend and relayed the result. Success!

Sample of custom PowerShell cmdlets to manage Azure ServiceBus queues

A customer I’m working with these days is investing in automating the provisioning and de-provisioning a fairly complex solution on Azure using PowerShell and Azure Automation to help lower their running costs and provide increased agility and resiliency.

Within their solution they use Azure Service Bus Queues and Topics and unfortunately there are no PowerShell cmdlets to create and delete these.

Thankfully, creating PowerShell cmdlets is very easy and with the rich SDK for Service Bus creating a few cmdlets to perform the key actions around queue provisioning and de-provisioning took very little time.

In this post I wanted to outline the process I went through and share the sample I ended up producing.

First, I needed to get my environment ready – – to develop a custom PowerShell cmdlet I needed a reference to System.Management.Automation.

This assembly gets installed as part of the Windows SDK  into the folder C:\Program Files (x86)\Reference Assemblies\Microsoft\WindowsPowerShell  so I installed the SDK for Windows 8.1 which can be found here.

Once installed, I created a new Class Library project in Visual Studio and added the reference.

Given that I’ve never developed a cmdlet before I started with a very simple cmdlet to wrap my head around it, turns out that creating a simple cmdlet that returns the list of queues in an Azure Service Bus namespace is incredibly simple –

 [Cmdlet(VerbsCommon.Get, "AzureServiceBusQueue")]
    public class GetAzureServiceBusQueue : Cmdlet
    {
        protected override void EndProcessing()
        {
            string connectionString = string.Format("Endpoint=sb://{0}.servicebus.windows.net/;SharedAccessKeyName={1};SharedAccessKey={2}", Namespace, SharedAccessKeyName, SharedAccessKey);
            NamespaceManager nm = NamespaceManager.CreateFromConnectionString(connectionString);
            WriteObject(nm.GetQueues(), true);
        }
    }

I created a class and inherited from CmdLet in the System.Management.Automation namespace and added the Cmdlet attribute. it is the latter that provides the actual Cmdlet name in the verb-noun structure.


I then added an override for EndProcessing which creates an instance of the Service Bus’ NamespaceManager class with a connection string (in the code above I obviously removed the members I added to hold the hardcoded credentials, you will need to add these), used it to retrieve all the queues in the namespace and wrote them as the output from the CmdLet using the base class’ WriteObject method.

The true parameter tells PowerShell to enumerate over the responses.

Once compiled I used Import-Module to load my cmdlet and call it using Get-AzureServiceBusQueue. The result was an output of all the properties of the queues returned. magic.

Ok – so the next step was obviously to stop hardcoding the connecting string details – I need a few properties for my CmdLet –

I removed my hard-coded members and added properties to the class as follows –

        [Parameter(Mandatory = true, Position = 0)]
        public string Namespace { get; set; }

        [Parameter(Mandatory = true, Position = 1)]
        public string SharedAccessKeyName { get; set; }

        [Parameter(Mandatory=true, Position=2)]
        public string ShareAccessKey { get; set; }

Mandatory is self-explanatory. Position allows the user to pass the parameters without specifying their name but by specifying them in the correct order. I could now use this CmdLet in two ways

Get-AzureServiceBusQueue –Namespace <namespace> –SharedAccessKeyName <key name> –SharedAccessKey <key>

or

Get-AzureServiceBusQueue <namespace> <key name> <key>

both yield exactly the same result.

Next I knew I needed to add more CmdLets – to create and remove queues – for example, and it seemed silly to re-create a namespace manager every time.

The next logical step was to create a CmdLet that created a Namespace Manager and then pass that into any other queue-related CmdLet, I started by creating the Get-AzureServiceBusNamespaceManager CmdLet as follows –

[Cmdlet(VerbsCommon.Get,"AzureServiceBusNamespaceManager")]
    public class GetAzureServiceBusNamespaceManager : Cmdlet
    {
        [Parameter(Mandatory = true, Position = 0)]
        public string Namespace { get; set; }
        [Parameter(Mandatory = true, Position = 1)]
        public string SharedAccessKeyName { get; set; }
        [Parameter(Mandatory=true, Position=2)]
        public string ShareAccessKey { get; set; }
        protected override void EndProcessing()
        {
            base.EndProcessing();
            string connectionString = string.Format("Endpoint=sb://{0}.servicebus.windows.net/;SharedAccessKeyName={1};SharedAccessKey={2}",Namespace,SharedAccessKeyName,ShareAccessKey);
            WriteObject(NamespaceManager.CreateFromConnectionString(connectionString));
        }
    
    }

With this in place I removed the creation of  the NamespaceManager from the Get-AzureServiceBusQueue CmdLet and added a parameter, it now looked like this –

 [Cmdlet(VerbsCommon.Get, "AzureServiceBusQueue")]
    public class GetAzureServiceBusQueue : Cmdlet
    {
        [Parameter(Mandatory = true, ValueFromPipeline = true)]
        public NamespaceManager NamespaceManager { get; set; }
        protected override void EndProcessing()
        {
            WriteObject(NamespaceManager.GetQueues(), true);
        }
    }

I made sure to set the ValueFromPipeline property of the Parameter attribute to true; this allows me to pass the namespace manager as an object down the powershell pipeline and not just as a parameter. It meant I had two ways to use this CmdLet

Get-AzureServiceBusNamespaceManager <namespace> <sas key name> <sas key> | `
Get-AzureServiceBusQueue

or using two separate commands –

$namespaceManager - Get-AzureServiceBusNamespaceManager <namespace> <sas key name> <sas key> 
Get-AzureServiceBusQueue -Namespace $namespaceManager

The last bit I wanted to add is an optional parameter allowing me to specify the path of the queue I’m interested in so that I don’t have to retrieve all the queues all the time.  I also moved the code from EndProcessing to ProcessRecord which means it will get called for any item piped in. in theory that allows for a list of namespace managers to be pushed in, although i don’t really see that’s happening. The final CmdLet looks like this –

[Cmdlet(VerbsCommon.Get, "AzureServiceBusQueue")]
    public class GetAzureServiceBusQueue : Cmdlet
    {
        [Parameter(Mandatory = false, Position = 0)]
        public string[] Path { get; set; }

        [Parameter(Mandatory = true, ValueFromPipeline = true)]
        public NamespaceManager NamespaceManager { get; set; }
        protected override void ProcessRecord()
        {
            base.ProcessRecord();

            IEnumerable<QueueDescription> queues = NamespaceManager.GetQueues();
            if (null != Path)
                queues = queues.Where(q => Path.Contains(q.Path));

            WriteObject(queues, true);
        }
    }

Actually, as I started to think about the next few Cmdlets I’ve realised they would all need the namespace manager parameter, so I extracted that to a base class and inherited from that.

With this done, I added further Cmdlets to remove and create queues (for the latter, I’ve added a few more properties) –

[Cmdlet(VerbsCommon.Remove, "AzureServiceBusQueue")]
    public class RemoveAzureServiceBusQueue : AzureServiceBusBaseCmdlet
    {
        [Parameter(Mandatory = true, Position = 0)]
        public string[] Path { get; set; }

        protected override void ProcessRecord()
        {
            base.ProcessRecord();
            foreach (string p in Path)
            {
                if (NamespaceManager.QueueExists(p))
                    NamespaceManager.DeleteQueue(p);
                else
                    WriteError(new ErrorRecord(new ArgumentException("Queue " + Path + " not found in namespace " + NamespaceManager.Address.ToString()), "1", ErrorCategory.InvalidArgument, NamespaceManager));
            }
        }
    }
 [Cmdlet("Create","AzureServiceBusQueue")]
    public class CreateAzureServiceBusQueue : AzureServiceBusBaseCmdlet
    {
        [Parameter(Mandatory=true,Position=0)]
        public string[] Path { get; set; }
        [Parameter(HelpMessage="The maximum size in increments of 1024MB for the queue, maximum of 5120 MB")]
        public long? MaxSize { get; set; }

        [Parameter(HelpMessage="The default time-to-live to apply to all messages, in seconds")]
        public long? DefaultMessageTimeToLive { get; set; }

        bool enablePartitioning;
        [Parameter()]
        public SwitchParameter EnablePartitioning
        {
            get { return enablePartitioning; }
            set { enablePartitioning = value; }
        }
        protected override void ProcessRecord()
        {
            base.ProcessRecord();
            foreach (string p in Path)
            {
                QueueDescription queue = new QueueDescription(p);

                if (MaxSize.HasValue)
                    queue.MaxSizeInMegabytes = MaxSize.Value;
                if (DefaultMessageTimeToLive.HasValue)
                    queue.DefaultMessageTimeToLive = new TimeSpan(0, 0, 0, int.Parse(DefaultMessageTimeToLive.Value.ToString()));
                queue.EnablePartitioning = enablePartitioning;
                NamespaceManager.CreateQueue(queue);
            }
        }
    }

Of course, this is by no means complete, but it does perform all 3 basic operations on queues and can easily be expanded to support everything that the customer requires to support their automation needs

Microsoft Azure Media Indexer basics – Part 3

In this part of the series covering the basics of using the Azure Media Indexer to make speech in audio and/or video assets searchable with SQL Server Full-text-search I will cover the basics of querying the database to find assets based on spoken words and even list the locations within these assets where the words had been spoken.

If you haven’t already, I suggest that you look at the previous two posts – part 1 covers the basics of uploading and processing an asset to produce the audio index (AIB) and closed captions files and part 2 covers how to prepare the SQL environment and load the AIB into it to enable searching.

With AIB files loaded into a table enabled for full-text-search and with the Media Indexer SQL-Add-on installed, searching for spoken words in assets using the database is nearly as simple as using standard SQL full-text-search constructs, but not quite, some differences and best practices exist and I’ll try to cover the main ones here.

The first thing to note is that when querying over AIB files the terms placed within CONTAINS or CONTAINSTABLE need to be encoded. This encoding can be done manually but it is easier (and useful for other purposes, more on this next) to use the Retrieval class provided with the SQL add-on within the MSRA_AudioIndexing_Retrieval assemly. you can find both x86 and x64 versions in the [InstallDir]\Indexer_SQL_AddOn\bin folder.

A ‘standard’ full-text-search query that looks for the word ‘microsoft’ in the title column of the File table looks like

SELECT FileID FROM Files WHERE CONTAINS(Title,' FORMSOF (INFLECTIONAL,"microsoft") ')

Having been expanded by the Retrieval class a similar query looking for the spoken word ‘microsoft’ in an AIB file contained in the AIB column of the table would look like

SELECT FileID FROM Files WHERE CONTAINS(AIB,' FORMSOF (INFLECTIONAL,"spoken:microsoft@@@") ')

The number of @ influences the confidence level in the matching the SQL filter will apply during query execution, the more @ you have the more inclusive the query will be.

As indicated, thankfully, one does not have to perform the encoding manually, a call to the ExpandQuery or BuildContainsTableClause static methods of the Retrieval class can be used –

string queryText = "microsoft speech"
string sqlContainsClause = Retrieval.ExpandQuery(queryText);
string sqlText = "select FileID ID from Files where contains(AIB,'" +
 sqlContainsClause + "')";

Running this SQL query against the database will return all rows where the terms requested appear within the row’s AIB data (the query can contain one more more words separated by a space or a double-quoted phrase strings), but the magic does not stop there –

If you use ContainsTable the result set will include an initial ranking score for the match –

string queryText = "microsoft speech"
string sqlContainsTableClause =
 Retrieval.BuildContainsTableClause(queryText, "Files", "AIB", 5);
string sqlText = "select FileID ID from Files inner join " +
 sqlContainsTableClause +
 " AS CT on Files.FileID = CT.[KEY] ORDER BY Rank";

This initial ranking is a useful measure to the quality and number of the matches found and so it is useful to sort the records returns by descending order of this ranking.

The initial ranking is approximate, but the Retrieval class also provides a ComputeScore method which takes a query and the AIB (and two other parameters I’ll touch upon shortly) and provides a more thorough ranking.

Because this requires the entire AIB’s contents, it makes sense to not run this on the entire set and this is exactly where the approximate ranking pays off, so the initial flow of a query would be to run the query using CONTAINSTABLE, sort by ranking and take the top n results.

Then one can choose to run the deeper scoring on these selected results by retrieving the AIBs for them from the database and calling the ComputeScore method.

Another thing the ComputeScore method can do is generate a set of snippets from the AIB . if snippets are requested  (by setting the third parameter of the ComputeScore method to true) the process will return with the score a list of snippets, each representing a section of the media file where one or more of the terms sought were found. for each snippet a start and end time is supplied (in seconds from start of media) as well as the score and even the extracted text as a string.

This allows calling applications to be very detailed – an application can display the snippets of text where query terms were found and ‘deep link’ into the media allowing the user to play the relevant section of the media.

The fourth parameter to the ComputeScore method is the maximum number of seconds to include in either side of a term found when extracting the snippet.

a call to the method looks like this

Retrieval.ScoringResult scoringResult = Retrieval.ComputeScore(queryText, result.AIB, false, snippetContext);

Again – this computation can be comparatively extensive and so it would make sense to do that either as a second step after the initial database query and filtering on the approximate score or even, in some cases, it might be worth further limiting the initial result set by getting the details scoring, without the snippets, and only generate snippets for records actually rendered on screen

The power is that one has all the options.

Overall, the process looks like this –

image

Naturally – the size of the AIB file can be quite large (a 40 minute mp3 file I processed resulted in 991kb AIB file) and so transferring this across the network every time a user runs a query may not be wise.

For this reason I think the right pattern is to implemented the query logic within a simple Web API which can be placed on the SQL server itself. This allows for the most efficient transfer of the AIB data and only returning the analysis result, which is a much smaller data set, to the client.

A client can call the API, passing in the term to look for and return a list of matches with snippet information and because this snippet (and hits) information contains time positions within the asset (in seconds) it can use these in the client to start playback of the asset at the relevant location (and even display the text relevant to the match)

An example of a response from a WebAPI I created looks like this (I searched for ‘money’ and ‘criminal’ in a You and Yours BBC Radio 4 podcast) –

[
-{
    Title: "test title"
    URL: "assets\\yyhighlights_20141010-1400a.mp3"
Rank: 3
Duration: 2375.840002
-Snippets: [
-{
    -Hits: [
    -{
        TermScore: 0
        EndPos: 8
StartPos: 0
EndTime: 102.210007
StartTime: 101.57
QueryTerm: "criminal"
}
-{
    TermScore: 0
    EndPos: 31
StartPos: 26
EndTime: 104.01
StartTime: 103.670006
QueryTerm: "money"
}
]
EndTime: 104.25
StartTime: 101.57
Text: "criminal using her to get money out "
}
-{
    -Hits: [
    -{
        TermScore: 0
        EndPos: 70
StartPos: 65
EndTime: 130.17

Another possible approach is to use SQLCLR to run the scoring method directly in the database. This will certainly be more efficient in terms of data transfer but everyone likes this approach. again – its good to have options.

Microsoft Azure Media Indexer basics – Part 2

In my previous post I’ve described the Azure Media indexer at high level and walked through the steps required to produce the AIB file (amongst other things) for a video or audio asset.

Whilst AIB files can be processed individually (as will be touched upon in the next post), the real power comes from using them in conjunction with the Media Indexer SQL Server add-on , allowing the result of the media indexing job to be integrated into SQL Server’s full text search capability.

To do that a SQL Server instance needs to be prepared with the SQL add-on and this short post will discuss the steps taken to prepare a database to be searchable.

The first step is to download the Azure Media Indexer SQL Add-on which, at the time of writing, can be found here

Once downloaded run either the x86 or x64 installer as required which will perform the installation steps and expand the SDK files (by default into C:\Program Files\Azure Media Services Indexer SDK)

The best next step at this point, in my opinion at least, is to read the user guide delivered with the SDK which can be found under the [Install Dir]\Indexer_SQL_AddOn\Docs folder within the installation location as this explains quite a lot about how the add-on works and how it should be used as well as describing the capabilities and usage of the classes available within the MSRA_AudioIndexing_Retrieval.dll assembly that ships with the SDK.

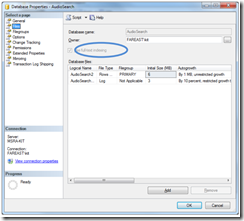
The installer would have configured the full text search filter within SQL Server and so the next step is to have a database in which the AIB data will be stored and to ensure that full text search is enabled on the database –

image

Within the database, you can create a table to hold the AIB data. The minimum requirement, as outlined by the user guide is to have two columns – a column called ‘AIB’ of type varbinary(max) to hold the bytes of the AIB file and a column called ‘Ext’ of type varchar(4) to hold the extension which should always be ‘.aib’.

This could be a dedicated table or columns added to an existing table. Obviously you would want to include some sore of reference to the original content and metadata so that this information can be available alongside the search results.

The AIB column needs to be configured for full-text-search, a SQL script to create a sample table exists in the SDK in the location – [InstallDir] \code\Setup.sql, below is the part of the script that creates the full text search catalogue and associates the AIB and FilePath columns with it

CREATE FULLTEXT CATALOG AudioSearchFTCat

CREATE FULLTEXT INDEX ON
	files (AIB TYPE COLUMN ext LANGUAGE 43017, 
			FilePath LANGUAGE English)
			KEY INDEX IX_Files
			ON AudioSearchFTCat
	WITH CHANGE_TRACKING AUTO

and that is it!

Following these steps the SQL server and table created are ready to be used to index media files, a simple insert, such as the example below can then add data to the table which will then be query able

buffer = System.IO.File.ReadAllBytes(filePath); using (SqlConnection con = new SqlConnection(m.ConnectionString)) { con.Open(); using (SqlCommand cmd = new SqlCommand("insert into files
(Title, Description,Duration, FilePath, Ext,AIB) values
(@Title, @Description, @Duration, @FilePath,@Ext, @AIB)", con)) { cmd.Parameters.Add(new SqlParameter("@Title", "test title")); cmd.Parameters.Add(new SqlParameter("@Description", "test description")); cmd.Parameters.Add(new SqlParameter("@Duration", duration)); cmd.Parameters.Add(new SqlParameter("@FilePath", "assets\\" + assetName)); cmd.Parameters.Add(new SqlParameter("@Ext", ".aib")); cmd.Parameters.Add(new SqlParameter("@AIB", SqlDbType.VarBinary,
buffer.Length, ParameterDirection.Input, false, 0, 0,
"AIB", DataRowVersion.Current, (SqlBinary)buffer)); int result = cmd.ExecuteNonQuery(); tick4.Visibility = System.Windows.Visibility.Visible; } }

In the third post in this series I go over the basics of querying the table for spoken words in the source media file.