Copying a blob snapshot to another blob

Recently I had a question in the comments on my blog post Backing up a Windows Azure Virtual Machine using PowerShell –

Can a snapshot blob be copied to another location instead of overwriting the original blob?

The short answer is yes, of course, as snapshots present themselves more or less like any other blob, but there is a subtle point around how to reference the snapshot so I thought it’s worth demonstrating using a quick console app, here are the key steps –

I created a console app and added the necessary references using

Install-Package WindowsAzure.Storage

I already had a few blobs I could play with, so I just added a couple of lines to connect to the account and create a snapshot of one of them 

string storageConnection = ConfigurationManager.AppSettings["StorageConnectionString"];
CloudStorageAccount storageAccount = CloudStorageAccount.Parse(storageConnection);
CloudBlobClient blobClient = storageAccount.CreateCloudBlobClient();

CloudBlobContainer container = blobClient.GetContainerReference("metars");
CloudBlockBlob blob = container.GetBlockBlobReference("EGLL.txt");

CloudBlockBlob snapshot = blob.CreateSnapshot();

.csharpcode, .csharpcode pre
{
font-size: small;
color: black;
font-family: consolas, “Courier New”, courier, monospace;
background-color: #ffffff;
/*white-space: pre;*/
}
.csharpcode pre { margin: 0em; }
.csharpcode .rem { color: #008000; }
.csharpcode .kwrd { color: #0000ff; }
.csharpcode .str { color: #006080; }
.csharpcode .op { color: #0000c0; }
.csharpcode .preproc { color: #cc6633; }
.csharpcode .asp { background-color: #ffff00; }
.csharpcode .html { color: #800000; }
.csharpcode .attr { color: #ff0000; }
.csharpcode .alt
{
background-color: #f4f4f4;
width: 100%;
margin: 0em;
}
.csharpcode .lnum { color: #606060; }

As you can see, the CreateSnapshot returns a blob, but – even as demos go – it is unrealistic to expect to want to copy a snapshot immediately after its creation, so I drop this object and start from scratch.

To find the snapshot again I need to enumerate on all the blobs in the container, indicating to the platform I wish to see snapshots (and for that purpose – flattening the result as well).

As I’m only interested in this specific blob at this point I can add its name as the prefix –

string storageConnection = ConfigurationManager.AppSettings["StorageConnectionString"];
CloudStorageAccount storageAccount = CloudStorageAccount.Parse(storageConnection);
CloudBlobClient blobClient = storageAccount.CreateCloudBlobClient();

CloudBlobContainer container = blobClient.GetContainerReference("metars");

IEnumerable<IListBlobItem> blobAndSnapshots = container.ListBlobs( 
       prefix: "EGLL.txt",        
       useFlatBlobListing: true,         
       blobListingDetails: BlobListingDetails.Snapshots); 

.csharpcode, .csharpcode pre
{
font-size: small;
color: black;
font-family: consolas, “Courier New”, courier, monospace;
background-color: #ffffff;
/*white-space: pre;*/
}
.csharpcode pre { margin: 0em; }
.csharpcode .rem { color: #008000; }
.csharpcode .kwrd { color: #0000ff; }
.csharpcode .str { color: #006080; }
.csharpcode .op { color: #0000c0; }
.csharpcode .preproc { color: #cc6633; }
.csharpcode .asp { background-color: #ffff00; }
.csharpcode .html { color: #800000; }
.csharpcode .attr { color: #ff0000; }
.csharpcode .alt
{
background-color: #f4f4f4;
width: 100%;
margin: 0em;
}
.csharpcode .lnum { color: #606060; }

Note: this will return the blob AND all its snapshots, so if wishing to enumerate on the snapshots only ignore any items with SnapshotTime value of null.

Once again – the result is a list of blobs, and so one can easily create a copy of the snapshot using the standard blob operations, a simple blob copy function could look something along the lines –

            //create a reference to targt blob
            ICloudBlob newCopy = container.GetBlockBlobReference("target.txt");
            //create a callback to note completion of copy
            AsyncCallback callBack = new AsyncCallback(CopyCompleted);
            //start copy
            newCopy.BeginStartCopyFromBlob(sourceBlob.Uri, callBack, null);

.csharpcode, .csharpcode pre
{
font-size: small;
color: black;
font-family: consolas, “Courier New”, courier, monospace;
background-color: #ffffff;
/*white-space: pre;*/
}
.csharpcode pre { margin: 0em; }
.csharpcode .rem { color: #008000; }
.csharpcode .kwrd { color: #0000ff; }
.csharpcode .str { color: #006080; }
.csharpcode .op { color: #0000c0; }
.csharpcode .preproc { color: #cc6633; }
.csharpcode .asp { background-color: #ffff00; }
.csharpcode .html { color: #800000; }
.csharpcode .attr { color: #ff0000; }
.csharpcode .alt
{
background-color: #f4f4f4;
width: 100%;
margin: 0em;
}
.csharpcode .lnum { color: #606060; }

Note: in ‘real world’ using the async based interface with its Start and End methods would be more useful, but this patterns is well documented.

But here’s the subtle point – whether the a blob is a snapshot or not, it’s Uri property will refer to the main blob and not to any snapshot and so using the copy code above with the sourceBlob referencing a snapshot will copy the main blob and not its references snapshot.

To copy the snapshot a specific Url needs to be constructed and used, here’s the modified code –

            //construct snapshot's uri
            string snapshotUrl = getSnapshotUrl(sourceBlob);
            //create a reference to targt blob
            ICloudBlob newCopy = container.GetBlockBlobReference("target.txt");
            //create a callback to note completion of copy
            AsyncCallback callBack = new AsyncCallback(CopyCompleted);
            //start copy
            newCopy.BeginStartCopyFromBlob(new Uri(snapshotUrl), callBack, null);

.
.
.
        private static string getSnapshotUrl(CloudBlockBlob snapshotBlob)
        {
            string encodedTime = System.Web.HttpUtility.UrlEncode(snapshotBlob.SnapshotTime.Value.ToString("yyyy-MM-ddTHH:mm:ss.fffffffZ"));
            return string.Format("{0}?snapshot={1}", snapshotBlob.Uri, encodedTime);
        }

.csharpcode, .csharpcode pre
{
font-size: small;
color: black;
font-family: consolas, “Courier New”, courier, monospace;
background-color: #ffffff;
/*white-space: pre;*/
}
.csharpcode pre { margin: 0em; }
.csharpcode .rem { color: #008000; }
.csharpcode .kwrd { color: #0000ff; }
.csharpcode .str { color: #006080; }
.csharpcode .op { color: #0000c0; }
.csharpcode .preproc { color: #cc6633; }
.csharpcode .asp { background-color: #ffff00; }
.csharpcode .html { color: #800000; }
.csharpcode .attr { color: #ff0000; }
.csharpcode .alt
{
background-color: #f4f4f4;
width: 100%;
margin: 0em;
}
.csharpcode .lnum { color: #606060; }


As you can see- to copy the snapshot and not the main blob the source url needs to be changed to include the snapshot time offset. Doing so creates a new blob with the snapshot’s contents.

In this case I used the same container, but I could have used any other container or indeed another storage account.


Note: when copying a blob snapshot to another storage account one has to obtain, and provide, a shared signature signature token to the copy command (see example of such copy here). When doing so it is important that the token is the first query string parameter and the snapshot detail is provided after that (separated by an ampersand (‘&’), of course).

Taking VHD snapshot with Windows Azure Virtual Machines

One very useful capability of virtualisation (in general) is the ability to take snapshots of a disk at a point in time, allowing restoring the machine to a known state quickly and easily.

With Windows Azure Virtual Machines one does not have access to the hypervisor (for obvious reasons!), so could this be achieved?

The answer is – by taking a snapshot of the underlying blob on which the VHD is stored.

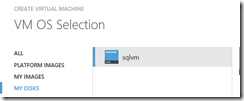
To demonstrate I’ve created a brand new Machine from the galley – I’ve used the SQL template-

image

I then went ahead and created a quick database and added several rows to it through the SQL Management Console –

image

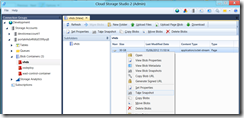
At this point, using Cerebrata’s Cloud Storage Studio in my case, I took a snapshot of the blob containing the VHD

image

With the snapshot taken I went ahead and removed the table, only to create a new one with slightly different structure and values, to make sure the state of the machine had changed since I took the snapshot –

image

Now I wanted to restore it to it’s previous state.

I could chose to do that to a brand new machine or to override the existing machine, the later would of course require that I first remove the machine (and disk) from the management portal so that the lease on the underlying blob would be returned making it writable, and that’s what I’ve done. If I wanted to create a new machine I would have used the CopyBlob capability to copy the snapshot to a new blob, making it writable (snapshots are read only), and then create a disk and machine out of that, next to my existing machine.

In my case I wen on to delete the Virtual Machine and the related disk and, using Storage Studio again in my case, I ‘promoted’ the snapshot – tthis simply copies the snapshot back to the original blob.

image

With this done, I now have the older snapshot as the current blob, and it was time to re-create the disk..

image

…and virtual machine –

image

image

..and sure enough, once the machine finished started I connected to it and looked at the databases using SQL Management studio again, which contained the original database and values, as expected –

image

Quick update – I have added a post about how to do this from PowerShell, read it here

Implementing a platform for exchanging files on Windows Azure

In a somewhat interesting coincidence I’ve had two discussions in as many weeks with separate companies about how to provide a platform to allow exchanging files with customers of theirs on Windows Azure.

Both companies are in the media business albeit in different ways and they both needed to exchange large-ish files with customers, but the transfer had to be protected (the materials exchanged are paid for and contain private IP) and they should be simple to use to everyone, without the need for elaborate technical implementation.

Windows Azure provides all the capabilities required to implement such a platform easily and quickly –

  • Blob storage is a natural place to store the files securely and cheaply.
  • Shared Access Signatures provide an easy mechanism to enable time-limited access to these files
  • Access Control Service provides an easy way to authenticate users using existing identities
    At the most basic level – the file provider could store it on a Windows Azure Storage blob, Create a Shared Access Signature (SAS) that allows access to the file for a time-limited period and share that URL with the customer.

These steps can be automated and integrated into existing processes, for example ones used to produce the file by the provider or procure it by the customer.

Having said that, whilst shared access signature provide an easy way to access protected resources on Windows Azure Storage, that ease of access comes with reduced security level – anyone who gains access to the URL containing the SAS gains access to the resource.

For that reason I generally prefer to provide access to blobs rather than containers, for example, or at least consider how many resources exist within any one container accessible via shared access signature and – more importantly in my view – I always prefer SAS with a short validity period rather than a long one (I’d say measured in hours, if not minutes, rather than days).

So – taking this into consideration – how can one provide access to files over a longer period of time more securely whilst still leveraging SAS for easy of use?

One option, when humans are involved, is a self-service portal for generating a short-lived SAS by the consumer –

Taking this approach, when a file gets produced for a customer, or rights are being assigned, the rights are written to an Azure Table keyed on the identity of the user.

Using public identities such as Live, Google, Yahoo or Facebook to identify users makes it easier for them to access the system (they do not need to remember another set of credentials) as well as for the system developer as Azure provides seamless, out of the box, integration with these through the ACS.

When a user accesses the system using the agreed identity she see a list of all the resources she can access according to the information in the table and with the list the ability to generate a short lived SAS for resources she selects.

Doing so will produce the URLs with the SAS which can be used to access the resources and these can be delivered to the user through the UI or using email or something similar for increased security.

These process can be a one-time process or one that allows multiple accesses, depending on the requirement and the time frame in which the user can generate these URLs is governed by the information in the Azure Table (which would include an expiration date), they key is that using short lived URLs reduces the risk of these being compromised.

A similar approach can be taken in system-to-system scenario, where a secure web-service interface can be used to obtain the SAS urls, which can then be used to access the resources; this double-hop may seem wasteful at first, as the web service could be used to return the actual contents of the blob, but for large resources it is more efficient for the client to access them directly.

Admittedly there’s a bit more work involved in building these scenarios compared to simply generating and sending SAS’ as needed, but the amount of extra work is quite small, and the benefit in terms of increased security is quite substantial; as always – there’s a balance between effort and security, one that each project has to evaluate.

Manipulating data in Windows Azure Table using PowerPivot

A customer asked yesterday a very good question – is it possible to use PowerPivot analyse data stored in Windows Azure Table Storage.

Given that Table Storage is exposed through oData, which is, as you’d expect, a data source fully supported by PowerPivot, my gut feeling was that this should not be a problem and, in fact, a very interesting scenario – many customers use Windows Azure Storage to store vast quantities of data, given how cost-effective it is and the scale that is possible, but ultimately data is there to be used, and PowerPivot is an amazing tool to process data – the two together make a powerful pair.

Looking at it closer, though, I stumbled into a small hurdle – whilst PowerPivot had support for working with data from Azure DataMarket out of the box for some time now and it supports working with oData feeds, I don’t believe it supports, currently, working with Azure Table Storage directly, the stumbling block being the ShareKey authentication mechanism.

However, this is too useful to give up, so I looked at a workaround, and the most obvious one was to take the man-in-the-middle approach and to publish a WCF Data Service onto an Azure Web Role (doesn’t have to be, of course, but makes perfect sense), which would expose a ‘standard’ oData feed to be consumed by PowerPivot and would get the data from the Table Storage. simples.

To do that I needed some data in Azure Tables and so I decided to use Cerebrata’s Cloud Storage Studio to upload the pubs database to Window Azure Storage – quite a cool and useful feature of their product if you ask me!
(Right click on the ‘Table’s’ node, choose ‘Upload Relational Database’ and follow the steps in the short wizard)

I decided to publish data from the roysched table, only because it had the most rows in it; to do that I create a class that represented a roysched entity –

[DataServiceKey("RowKey", "PartitionKey")]
    public class roysched
    {
        public string PartitionKey {get;set;}
        public string RowKey {get;set;}
        public DateTime Timestamp {get;set;}
        public string title_ID {get;set;}
        public int lorange {get;set;}
        public int hirange {get;set;}
        public int royalty {get;set;}

                public roysched()
        {
        }

        public roysched(string partitionKey, string rowKey, DateTime timestamp, string titleId, int lorange, int hirange, int royalty)
        {
            PartitionKey = partitionKey;
            RowKey = rowKey;
            Timestamp = timestamp;
            title_ID = titleId;
            this.lorange = lorange;
            this.hirange = hirange;
            this.royalty = royalty;
        }
    }

You will notice the DataServiceKey attribute I’ve added – this is needed for the Entity Framework to figure out which fields (or combination of keys, as is the case here) can be used as the identity of the entity as I’ve blogged here

With that done I needed to create a context class to be used by the WCF Data Service, this class will read data from Azure and ‘re-publish’ data as the feed behind the data, this is where the majority of the logic would generally go, but as you can expect I’ve kept this to the minimum for the purpose of this demonstration.

public class PubsContext
    {
        public IQueryable<roysched> list
        {
            get
            {
                var account = CloudStorageAccount.FromConfigurationSetting("DataConnectionString");
                var context = new AzurePubsContext(account.TableEndpoint.ToString(), account.Credentials);
                return context.AzureList;
            }
        }
    }

One thing to note is that whilst technically I could expose the TableServiceContext I’ve used to access Windows Azure Storage directly, I did not do that, following from the guidance that can be found here

Also bear in mind, as these samples often go, this is by no means the best or most efficient way of doing things, but I did want to keep things as simple as possible to focus on the concept rather than lines of code – in a real, production, code I would almost certainly not want to create the Azure TableServiceContext on every call!

The last ‘big’ piece in the puzzle is creating the data service itself – adding a WCF Data Service item to the project adds a handy template in which only the context class and list property are needed to be updated (highlighted in the code below)

public class SomeDataService : DataService<PubsContext>
{
    public static void InitializeService(DataServiceConfiguration config)
    {
        config.SetEntitySetAccessRule("list", EntitySetRights.AllRead);
        config.DataServiceBehavior.MaxProtocolVersion = DataServiceProtocolVersion.V2;
    }
}

To get everything working I needed to do a couple more small changes –

I needed to define the DataConnectionString configuration setting in the csdef file and add the connection string value pointing at my Azure Storage (or the local emulator), this is easily done through the Visual Studio UI.

Last – I needed to put the code to initialise set the configuration setting publisher in the Global.asax’ Application_Start handler, this is pretty standard for any project deployed on Azure –

// This code sets up a handler to update CloudStorageAccount instances when their corresponding
            // configuration settings change in the service configuration file.
            CloudStorageAccount.SetConfigurationSettingPublisher((configName, configSetter) =>
            {
                // Provide the configSetter with the initial value
                configSetter(RoleEnvironment.GetConfigurationSettingValue(configName));
            });

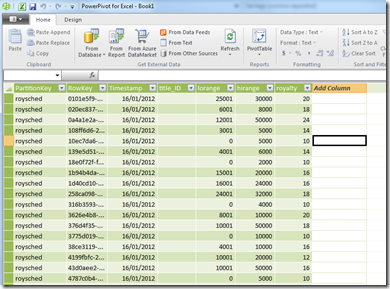
…and voila – calling this service exposed the information from Windows Azure as a basic oData feed, easily consumable from PowerPivot  –

image

One last thing to bear in mind, of course, is that I kept my service completely open for anonymous access, which you’d probably not want to do in real life, but as this is now a standard WCF Data Service than the normal configuration applies, and PowerPivot will support both SSPI and basic authentication)