Deploying an internal website using Azure Web Roles

The most common use for Web Roles is to host web workloads that are accessible from the public internet, but for enterprises a common requirement is to deploy load balanced web workloads that are only accessible from within their network (the Azure VNET and, in many cases, from on-premises via ExpressRoute) Turns out that this is quite easy to achieve, but perhaps not well known – To achieve this, two additions are needed in the cloud service project’s configuration file. Firstly – in the service definition file the web role is likely to have an InputEndpoint, to connect the endpoint to the internal load balancer one can add the loadBalancerName attribute  –

<Endpoints> <InputEndpoint name=”Endpoint1″ protocol=”http” port=”80″ loadBalancer=”MyIntranetILB” /> </Endpoints>

Then, in the service configuration file one has to link the web role to a subnet and corresponding vnet and provide the details around the load balancer, this is done by adding the following section after the Role element within the ServiceConfiguration Element –

<NetworkConfiguration> <VirtualNetworkSite name=”[vnet name]” /> <AddressAssignments> <InstanceAddress roleName=”[role name]”> <Subnets> <Subnet name=”[subnet name]” /> </Subnets> </InstanceAddress> </AddressAssignments> <LoadBalancers> <LoadBalancer name=”MyIntranetILB”> <FrontendIPConfiguration type=”private” subnet=”[subnet name]” staticVirtualNetworkIPAddress=”172.24.19.46″ /> </LoadBalancer> </LoadBalancers> </NetworkConfiguration>

Notice that you can (optionally) add a static ip for the load balancer – this is important as you’re likely to want to configure a DNS entry for this There is no need to create anything in advance other than the VNET and the Subnet – the internal load balancer will be created as part of the deployment. Upon a successful deployment the web role will NOT be accessible via the public internet and you will have a load balanced internal IP to access it from the VNET.

One of the questions I’ve been asked is whether the IP assigned to the ILB in the configuration file is registered with the DHCP server, and the answer appears to be yes. when I’ve configured an IP address right at the beginning on the subnet, the web roles and other VMs provisioned later on the network, were assigned IP addresses greater than the load balancer, so one does not have to worry about IP clashes when configuring an ILB in this fashion.

Mix-n-Match on Windows Azure

One of the powerful aspects of Windows Azure is that we now have both PaaS and IaaS and that – crucially – the relationship between the two is not that of an ‘or’ but rather one of an ‘and’, meaning – you can mix and match the two (as well as more ‘traditional’, non-cloud, deployments, coming to think of it) within one  solution.

IaaS is very powerful, because it is an easier step to the cloud for many scenarios – if you have an existing n-tier solution, it is typically easier and faster to deploy it on Azure over Virtual Machines than it is to migrate it to Cloud Services.

PaaS, on the other hand, delivers much more value to the business, largely in what it takes away (managing VMs).

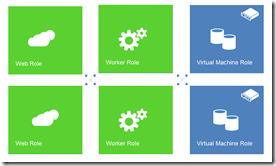
The following picture, which most have seen, I’m sure, in one shape or form, lays down things clearly –

image_thumb

And so – the ability to run both, within a single deployment if necessary, provides a really useful on-ramp to the cloud; Consider a typical n-tier application with a front end, middle tier and a back end database. The story could be something along these lines –

You take the application as-is and deploy it on Azure using the same tiered approach over VM roles - 

image4_thumb1

Then, when you get the chance, you spend some time and update your front end to a PaaS Web Role –

image8_thumb

Next – you upgrade the middle tier to worker roles –

image18_thumb

And finally – you migrate the underlying database to a SQL database –

image22_thumb

Over this journey you have gradually increased the value you get from your cloud, on your time frames, in your terms.

To enable communication between the tiers over a private network we need to make both the IaaS elements and the PaaS elements part of the same network, here’s how you do it –

Deploying a PaaS instance on a virtual network

With Virtual Network on Azure the first step is always to define network itself, and this can be done via the Management Portal using a wizard or by providing a configuration file –

image

The wizard guides you through the process which includes providing the IP range you’d like for the network as well as setting up any subnets as required. It is also possible to point at a DNS and link this to a Private Network – a VPN to a local network. for more details see Create a Virtual Network in Windows Azure.

With the network created you can now can deploy both Virtual Machines and Cloud Services to it.

Deploying Virtual Machines onto the network is very straight forward – when you run the Virtual Machine creation wizard you are asked where to deploy it to and you can specify a region, an affinity group or a virtual network –

image

If you’ve selected a network, you are prompted to select which subnet(s) you’d like to deploy it to –

image

and you’re done – , the VM will be deployed to the selected subnet in the selected network, and will be assigned the appropriate IP address.

Deploying Cloud Services to a private network was a little less obvious to me – I kept looking at the management portal for ways to supply the network to use when deploying an instance, and completely ignored the most obvious place to look – the deployment configuration file.

Turns out that a network configuration section has been added with the recent SDK (1.7), allowing one to specify the name of the network to deploy to and then, for each role, specify which subnet(s) to connect it to.

For detailed information on this refer to the NetworkConfiguration Schema, but here’s my example –

<ServiceConfiguration serviceName="WindowsAzure1" xmlns="http://schemas.microsoft.com/ServiceHosting/2008/10/ServiceConfiguration" osFamily="1" osVersion="*" schemaVersion="2012-05.1.7">
  <Role name="WebRole1">
    <Instances count="1" />
.
.
</Role>
  <NetworkConfiguration>
    <VirtualNetworkSite name="mix-n-match" />
    <AddressAssignments>
      <InstanceAddress roleName="WebRole1">
        <Subnets>
          <Subnet name="FrontEnd" />
        </Subnets>
      </InstanceAddress>
    </AddressAssignments>
  </NetworkConfiguration>
</ServiceConfiguration>

This configuration instructs the platform to place the PaaS instance in the virtual network with the correct subnet, and indeed, when I remote desktop into the instance, I can confirm that it had received a private IP in the correct range for the subnet (10.1.1.4, in my case) and – after disabling the firewall on my IaaS virtual machine – I can ping it successfully using its private IP (10.1.2.4).

It is important to note that the platform places no firewalls between tenants in the private network, but of course VMs may well still have their firewall turned on (the templates we provide do), and so these will have to be configured as appropriate.

And that’s it – I could easily deploy a whole bunch of machines to my little private network – some are provided as VMs, some are provided as code on Cloud Services, as appropriate, and they all play nicely together…

Somebody had renamed my website!

Last week I got an email from a customer who was surprised to find out that somebody had decided to point a different domain name to their web site (i.e. if there were Contoso.com, somebody pointed Northwind.com at their web site)

We couldn’t quite figure out why would somebody do that, or whether it’s really a problem but it certainly made them feel uncomfortable, and I can see why.

Technically there’s not much one can do to prevent others from doing this, and whilst you can go and complain to the registrar of the rouge domain, this is a hassle and will take some time to sort out, so a technical solution is needed to circumvent that.

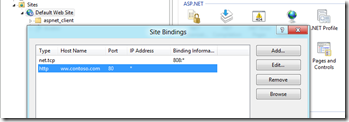
The best approach, as far as I can tell, is to set the host name property in the site bindings in IIS to the correct domain name(s), which would result in IIS rejecting any request carrying a different domain name(s) and, indeed, on-premises, this is what everybody seems to do –
image

Any request made to the web site using a different domain (easily simulated using the hosts file in C:\Windows\System32\drivers\etc), will result in an HTTP 400 or HTTP 503 errors.

To set the host name on a web role instance declaratively one could use the hostHeader attribute of the binding element in the ServiceDefinition.csdef file – this will instruct the fabric to set the value provided in IIS and, as a result, any request made using a different host name will get rejected.

The problem with setting the host name to the production domain is that it would prevent access to the system whilst on staging – when the URL includes a generated quid – the staging URL is not known at design time as as such cannot be provided in the ServiceDefinitions.csdef file.

The solution is to set the site bindings dynamically from within the deployment, and the easiest way to do that is from the OnStart method of the Role –

    public class WebRole : RoleEntryPoint
    {
        public override bool OnStart()
        {
            // For information on handling configuration changes
            // see the MSDN topic at http://go.microsoft.com/fwlink/?LinkId=166357.

            try
            {
                FixSiteBindings();
            }
            catch (Exception ex)
            {
                WriteExceptionToBlobStorage(ex);
            }
            return base.OnStart();
        }

Before I dive into my FixSiteBindings method I should point out that during the testing of this I’ve used the method pointed out by Christian Weyer to log any exception in OnStart to blob storage, which was very handy!

So – when the role start, FixSiteBindings is called, which looks as follows –

        void FixSiteBindings()
        {
            //web site name is the role instance id with the "_Web" postfix (WebSite name in ServiceDefinition.csdef)
            string webSiteName = RoleEnvironment.CurrentRoleInstance.Id + "_Web";

            using (ServerManager sm = new ServerManager())
            {
                //find web site
                Site site = sm.Sites[webSiteName];
                if (site == null)
                    throw new Exception("Could not find site " + webSiteName);
                //find the binding with hostName TBR - this is the one we need to replace
                Binding b = site.Bindings.FirstOrDefault(binding => binding.Host == "TBR");
                if (b != null)
                {
                    site.Bindings.Remove(b);
                    //add a binding with the expected domain - (address:port:hostName),protocol
                    site.Bindings.Add(string.Format(@"{0}:{1}:{2}", b.EndPoint.Address, b.EndPoint.Port, RoleEnvironment.DeploymentId + ".cloudapp.net"), b.Protocol);
                    sm.CommitChanges();
                }

            }
        }

In this code I use ServerManager (Microsoft.Web.Administration) to manipulate IIS settings and add the necessary bindings, but before I go into the code, let me explain the approach I’ve taken –

Ultimately, when my web site is in production, I need a host header for my domain name. I also need a host header with my staging URL, added dynamically.

As I might be using VIP swap between staging and production, I need to have both all the time because the OnStart code (or any start up tasks) will not run during a VIP swap, so I won’t get another chance to make any changes and besides – it is best to do as little as possible between staging and production to keep the system as stable as possible between environments.

Last – I need to ensure that the default binding, without the host header, does not exist, which would prevent others from pointing other domain names at my deployment.

To achieve all of the above I’ve concluded that the easiest way was to start with a ServiceDefinition.csdef file that defines the two bindings I need, use the domain name needed for production and a place holder, with a pre-determined host name for staging, in my case ‘TBR’ –

<?xml version="1.0" encoding="utf-8"?>
<ServiceDefinition name="HostName" xmlns="http://schemas.microsoft.com/ServiceHosting/2008/10/ServiceDefinition">
  <WebRole name="MvcWebRole1" vmsize="ExtraSmall">
    <Runtime executionContext="elevated"/>
    <Sites>
      <Site name="Web">
        <Bindings>
          <Binding name="Endpoint1" endpointName="Endpoint1" hostHeader="yossitest.cloudapp.net"/>
          <Binding name="Staging" endpointName="Endpoint1" hostHeader="TBR"/>
        </Bindings>
      </Site>
    </Sites>
    <Endpoints>
      <InputEndpoint name="Endpoint1" protocol="http" port="80" />
    </Endpoints>
    <Imports>
      <Import moduleName="Diagnostics" />
      <Import moduleName="RemoteAccess" />
      <Import moduleName="RemoteForwarder" />
    </Imports>
  </WebRole>
</ServiceDefinition>

When this gets deployed onto Azure I’ve already achieved two of my three requirements – there’s no default binding (as I’ve defined a host name for both endpoints) and I’ve got the production binding fully configured. I also have the beginning of my third requirement as I’ve got a binding for staging, and the known host name makes it easy to find it programmatically, so the last step would be to find that binding and update the host header with the correct value in the role’s OnStart method.

To achieve that I start with figuring out the name of the Web Site in IIS – this will be composed of the current role instance name, with the name of the web site as set in the ServiceDefinition.csdef flie as a postfix –  in my case “Web”.

With an instance of the ServiceManager I find the web site by name and then look for a binding with the host name ‘TBR’ – the one I need to update.

I’m ‘updating’ the binding by removing it and adding one in its place, making sure to use the values from the original one for everything but the host name, which keeps the flexibility of setting these through the ServiceDefinition file.

With the old binding removed and the new one added I commit the changes through the ServerManmager and I’m done – the role should now be set correctly allowing access to both production and staging.

One last thing worth pointing out is that for this code to run it must be run in elevated mode, otherwise trying to make any changes to IIS will result with an error due to lacking permissions; this can be achieved by adding the <Runtime executionContext=”elevated”/> element in the relevant role in the ServiceDefinition.csdef file as is shown above.

It is important to note that this only means that the RoleEntryPoint code will run in elevated mode, and rest of the role’s code will run as normal, which is quite important.

I’ve clearly taken a very specific approach to solve a very specific case.  I could have, for example, iterated over all the instance endpoints from the RoleEnvironment class and added the relevant bindings from that, which would be needed if the site had more than one endpoint; I’m sure that there are many variations for the solution above, but I hope that it provides a nice and easy solution for most and a good starting point for others.

Deploying WordPress to Azure?

I’ve been following the instructions here to deploy a WordPress site to Windows Azure.

The instructions were very detailed clear and the process is relatively painless, although I would recommend installing the SDKs using the web platform installer because it seems that some elements are sensitive to files locations..

For example, when I installed the Azure SDK for PHP I decided, for no good reason, really, to place it under the Windows Azurre SDK folder, so my path was C:\Program Files\Windows Azure SDK\C:\Program Files\Windows Azure SDK for PHP

When I reached the step to create the Azure package –

package create -in="C:\temp\WordPress" -out="C:\temp" -dev=false

I kept getting an error saying cspack.exe could not be found.

I checked and double checked the location of the file vs. the system path, and it all seemed fine, until I inspected the documentation, which suggested the code looks like this –

// Find Windows Azure SDK bin folders
$csPackFolderCandidates = array_merge(
isset($_SERVER[‘ProgramFiles’]) ? glob$_SERVER’ProgramFiles’] . ‘\Windows Azure SDK\*\bin’, GLOB_NOSORT) : array(),
isset($_SERVER[‘ProgramFiles(x86)’]) ? glob($_SERVER[‘ProgramFiles(x86)’] . ‘\Windows Azure SDK\*\bin’, GLOB_NOSORT) : array(),
isset($_SERVER[‘ProgramW6432’]) ? glob($_SERVER[‘ProgramW6432’] . ‘\Windows Azure SDK\*\bin’, GLOB_NOSORT) : array()

);

if (count($csPackFolderCandidates) == 0) {

            throw new Microsoft_Console_Exception(‘Could not locate the Windows Azure SDK. Download the tools from http://www.azure.com or using the Web Platform Installer.’);

}

$cspack = ‘"’ . $csPackFolderCandidates[count($csPackFolderCandidates) – 1] . ‘\cspack.exe’ . ‘"’;

This suggested to me that there were some assumptions made about the possible location of cspack.exe and that somehow my ‘setup’ was not catered for and indeed – after moving the Azure SDK for PHP folder to Program Files directly the package command worked just fine.

Another thing that I’ve learnt is how important it is to make sure the user was created correcly, with a schema that exists or that has the correct permissions – ALTER USER wordpress WITH DEFAULT_SCHEMA = dbo works for me!

Java on Azure

In my conversations with customers on Windows Azure the topic of running Java on Azure often comes up, where I would explain that Java developers can benefit from the PaaS capabilities of Azure just as much as .net developers including the elasticity and ‘self-healing’ properties of our Public Cloud offering whilst avoiding having to maintain VMs (or physical machines)

The best way to get an overview of the experience is to take a look at this 5 minute video as it covers all the steps required to take an existing JSP application in Eclipse and run it on Azure;  if you’d rather read than listen, carry on Smile

Overall, the experience for Java developers is pretty close to the one for .net developers, with a couple of notable differences I will touch upon shortly, so, to start with, let me describe how I got a simple Java application to run on on Azure –

I’m starting with Eclipse IDE for Java EE Developers (Indigo) and already have the Azure SDK installed on my laptop and so the only thing I need to do to prepare my Eclipse environment is to install the Azure plug-in for Eclipse, by using the Help->Install New Software Eclipse menu item and pointing it at http://dl.windowsazure.com/eclipse

(you can read all about it in the Windows Azure Java Developer Center)

With the IDE ready I create, for example, a new dynamic web project using Tomcat 7 as the server, add to it a JSP page and test it locally. normal stuff. (I can just about do a hello world)

With my ‘elaborate’ web application working locally, it is time to test it in the Azure Emulator and so I create a new ‘Windows Azure Project’ which is now available after installing the plug-in; to get my code included in the Azure project I export the WAR from the dynamic web project to the approot folder in it.

Last, and this is the only real difference between .net and Java with regards to deploying on Azure, is that I need to provide the JDK and the Server to run on the Azure role – .net doesn’t really have the concept of multiple servers, IIS is the de-facto web server , which is automatically included in all web roles. Azure roles also come out of the box with all the .net runtime versions to date; In the Java case developers have a choice of servers they could use and could target one of several JDK versions; for this reason the Azure project needs to include the selected JDK and Server packages and the script required to install them.

This is done by placing jdk.zip, which includes the JDK I wish to use and a zip file containing the server I wish to use – in my case tomcat7.zip containing apache-tomcat-7.0.22 server I downloaded earlier in the approot folder as well.

Last – I need to provide the role with a script telling it how to install what.

Thankfully – the Azure project template for Eclipse includes sample scripts for the most commonly used servers, namely TomCat 7, Glassfish OSE 3, JBoss AS 6 and 7 and Jetty as well as a custom script that can be expanded, and these takes care of any hassle so all I need to do is copy the contents of the sample script file provided for tomcat 7 to the startup.cmd file in the role and make sure all the file names are correct (WAR, JDK and Server packages)

That done my projects are now ready and after building I can run the RunInEmulator.cmd script, also included in the Azure project template, to deploy the role to the local Compute Emulator – this tests both the script and the application and, once deployed, I am be able to use my application hosted by the emulator-embedded-role.

Happy with that, the last step is to prepare the application to be deployed to the cloud, this is done by changing a property on the Azure project from “Testing in Emulator” to “Deployment to Cloud” and building again – now the project contains the package to be deployed to Azure, the configuration file accompanying it and even a shortcut to the management portal.

I use these in the management portal to initiate a new deployment and several minutes later I’ve got my Apache Tomcat server running my JSP page and no VM in sight!

Of course – with the package on Azure, the platform can deploy this time and time again when scaling up or when an instance fails and needs to be re-deployed.

Result! Smile


One final, temporary note: working on Windows 8 CTP I did find a small problem with the script provided – to avoid problems arising from long paths, the script creates a symbolic link on the root of the drive pointing at the location of the files (somewhere deep under the Eclipse workspace). Windows 8 seems very unhappy with unzipping files into a symbolic link location and the thing breaks. the temporary solution, if you are working on Windows 8, is to remove the step to CD into the symbolic link location. the default location is the approot folder anyway and everything works just fine. the nature of CTPs, I guess.